S.M.A.R.T. Health of disks
View of errors and current historical data of parameters indicating the health of drive on CM Portal
Example of remote tests result - faultless state of disk, defective disk
View of errors and current historical data of parameters indicating the health of drive on CM Portal
Health of disks is checked automatically on each PC, where C-Monitor client is installed, by monitoring of S.M.A.R.T. parameters. If status of the critical parameters gets worse, the operator is informed that the disk's health has worsen, automatically by an email message. The status will also appear in errors of the given customer. To remove the error, you must first confirm it. If you select perfect condition of disk at the confirmation, the error will disappear. The error will also disappear, when the disk is replaced by a faultless one, and then full descript on PC runs normally. If by testing you find out that the disk is indeed defective, then select the option to confirm defective disk, after which the error will be marked by a green tick and remains in the list of errors until the disk is replaced by a faultless one.

Information about the current state of local disks are gathered on CM portal in the section Presentation and Evaluation -> Presentation -> Zones -> Zone Disks - SMART as displayed on the next image.
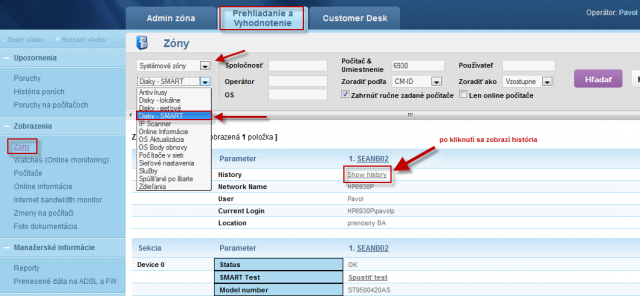
The next image shows the current state of S.M.A.R.T parameters. If the values aren't red, the disk should be fine. By clicking on a PC name, you'll see the history of SMART parameters changes.
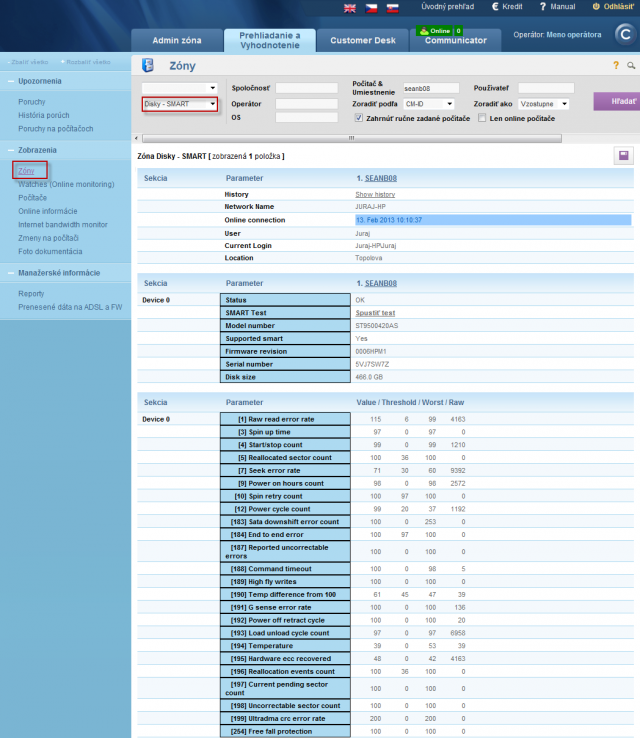
There are four values for each parameter. Columns:
Value - a constant defined by SMART standard (current value)
Threshold- a value, below which Value cannot go, otherwise the disk is defective
Worst - the worst recorded value so far
RAW - absolute value of the monitored parameter (e.g. number of reallocated sectors)
Critical S.M.A.R.T parameters evaluated in CM according to increase of error events
Reallocated Sectors Count: The number of sectors, that were marked as inapplicable by the disk's electronics, and the data was moved to another sector. The data transfer doesn't mean the data has been damaged, though for an increasing amount of bad sectors, the reading and writing speed decreases. This doesn't mean that these sectors will be displayed as bad when we'd scan the disk. Modern disks have an area of sectors, which they use to replace bad sectors, if there are any found.
Reallocation Events Count: Total number of both successful and unsuccessful tries to move data from damaged sectors.
Current Pending Sector Count: Number of sectors in the failing state. If the operation of writing and check of the written data is successful, the sector is classified as functional. Otherwise, the system will try to transfer these data.
Uncorrectable Sector Count: Number of permanently damaged sectors. The higher this number is, the bigger is the risk of failure of the entire disk.
Other parameters evaluated in CM only by Value reaching a value under Treshold
Read Error Rate: Errors of data reading. Any deficiencies in this area reffer to an error of reading heads or the disc surface. Intensive increasing of defectiveness almost always leads to irreversible data losses.
Spin Retry Count: Number of repeated tries to spin the discs. An increasing value indicates a problem with the engine, or the control electronics.
Spin-up Time: Time, in which the drive's discs spin up to the operating speed. Its increasing indicates malfunction of the engine, or eventually of the control electronics. When combined with high temperature, it's most likely a case of worn bearings.
Start/Stop Count: Number of cycles of the disk's turning on/off. High values in combination with a low amount of working time may be caused by bad setup of saving modes (for example turning off the disk after three minutes of inactivity, if data is written every four minutes).
Power On Hours count: Total running time since the disk's production. There's nothing we can do with high values.
Temperature: There can be more than one information, temperature sensors can be found in the disk's body, in the outside environment, as well as inside.
If some parameter values are red, it's necessary to check the disk's status. In C-Monitor version 2.6 and higher, there are Remote tests of hard drives available, read more in the text below.
If a disk doesn't pass these tests, the user must be notified, that it's effective to replace it, at best along with export of parameter history output. The export is done by clicking on the Excel icon in the top right corner.
If you don't want to use the integrated solution for testing disks via C-Monitor client, you can use the manufacturer's own software for testing potentially defective drives.
Remote tests of hard drives
Launch of the remote test from the zone - Disks - S.M.A.R.T
Launch of the remote test from the section Errors
Launch of the remote test of hard drive from e-mail
Assessment of the final and ongoing reports from remote drives tests
Since version 2.6, C-Monitor client provides an option to remotely test hard drives. The test of a drive can be launched on several places. The test's result, as well as the ongoing status will be delivered to you by email. During the test, the user may work normally and won't be limited at all, as he won't even be aware that the test is running. Read more information in the text below.
Launch of the remote test from the zone - Disks - S.M.A.R.T
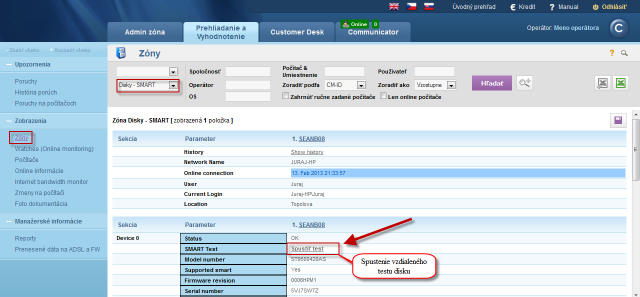
Test of a disk can be carried out directly from the zone Disks - SMART, which is located in the section Presentation and Evaluation -> Presentation -> Zones -> Zone Disks - SMART. Search for a specific computer using the upper filter, and press the button Run test as displayed on the next image.
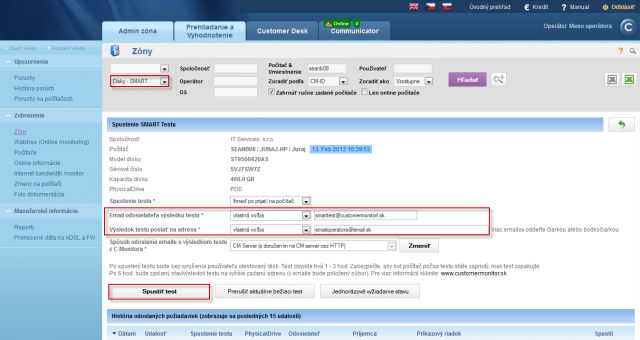
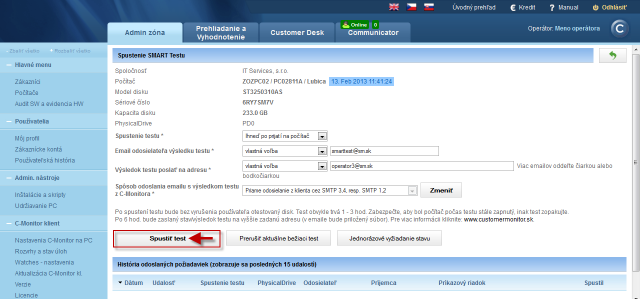
In the next window you can enter any email address of the test result's sender, or keep the default address, and into the field send test result to address enter email or emails, to which the result is going to be sent, default address is the currently logged operator's one. Then press Run test which triggers an instruction to C-Monitor client to execute the test of drive. Here you can also interrupt a currently running test, as well as request the status of also running tests, which is also going to be sent to your email.
Launch of the remote test from the section Errors
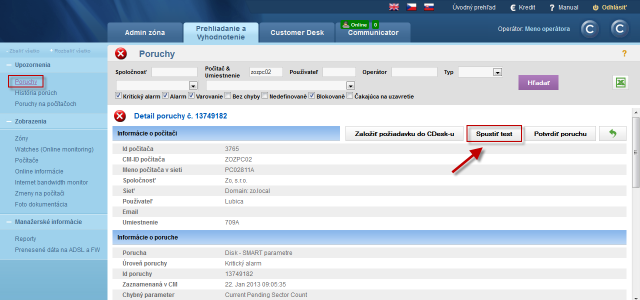
Another option to launch the test is in the section Presentation and Evaluation -> Warnings -> Errors, then search for a specific S.M.A.R.T error. In this error's detail, there's a button to launch remote test of the disk, as displayed on the next image. The following window is the same as described for launching the test through the zone Disks - SMART, therefore, all settings are the same as well.
Launch of the remote test of hard drive from e-mail
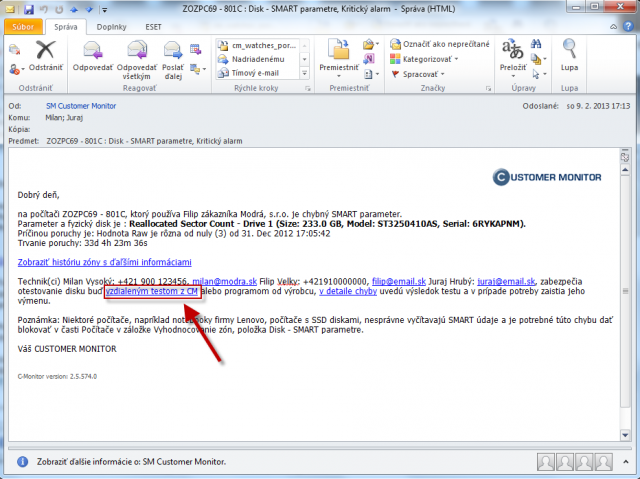
For each error that is automatically evaluated on a computer, an information about the error is sent to the operator by email. When one of the important S.M.A.R.T parameters is changed, an error is generated that warns about defective disk. An email is sent to the operator regarding this situation, which is displayed on the next image. A link to execute a remote test of the disk from CM Portal is highlighted in the text. By clicking on this link, you'll be automatically redirected to CM Portal webpage.
After login to CM portal, you'll see this next window, where you just perform the same settings as are described at launch of the remote test from the section zone Disks - SMART, and start the test
Logs recording the test's execution, single status requests, as well as completion, are located in the bottom part of the window from where the tests are launched, and are displayed on the next image.
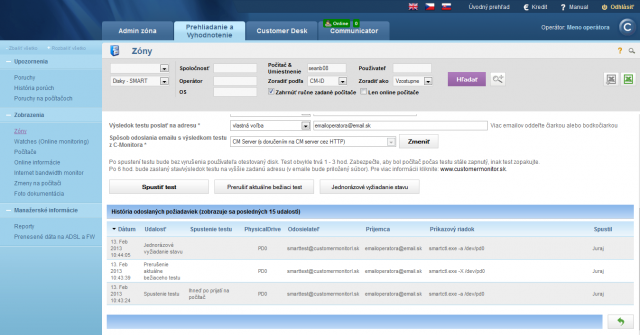
Assessment of the final and ongoing reports from remote drives tests
Request for status of a disk's test is performed automatically after 6 hours since the test started. You may request an ongoing status of the test anytime by clicking on the button onetime check of status, which is in the same section as the button for the test's execution. Results and status of the test will be delivered to you by email, which is displayed on the following image. The results are saved in the attachments, marked by an arrow on the image, and it can be opened in the Notepad.
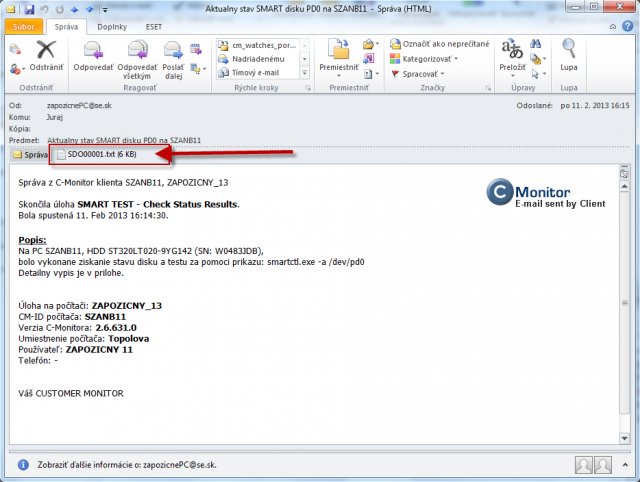
After opening the attachment, you'll see a report from the disk's test. Important parts that you should see are displayed on the next image.
First, check if the test ran on the required disk, by capacity or serial number. Sometimes, it might happen that name of the disk has changed after PC restart, and doesn't match the name on CM portal. Disks are only called according to PDx (Physical disk x).
In the bottom part of the report, marked as SMART Self-test log structure revision number 1, is the result of the test. Possible final states are described in the text below.
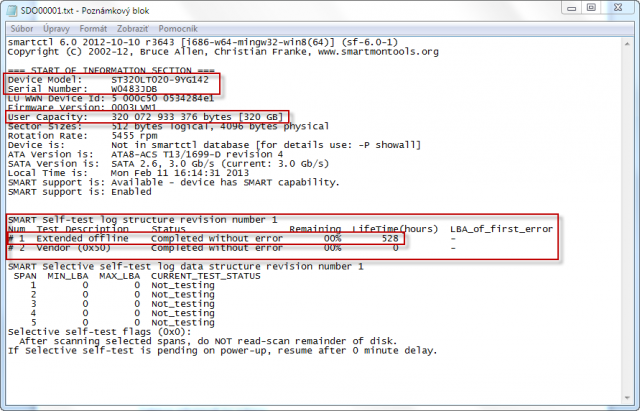
Test has verified faultless state of the disk
The test ran without any errors, output from such test is displayed below. Text in the column Status gives information whether the test ran without errors - the disk is fine.

Test has proven a defective disk
The test is completed and an error has been found, the next image nicely shows result of a test, which has proven that the disk is faulty. For such tests, we recommend to replace the disk.

Other possible states
1. Test is still running, output from this status is displayed below, there's also an information how many % remain to the test's completion.

2. The test hasn't run at all, description of possible states and reasons
a, If the output report contains the message Interrupted (host reset) , it means that a user has most likely turned off the device, on which the disk was tested. We recommend to settle on, that the user keeps the device turned on for at least 6 hours since beginning of the test, to be sure that the test will have enough time to be completed.
b, In case you're sure that the device has not been turned off, this message means that the test couldn't be finished, as the disk's defection is at such a high level, it simply wasn't possible. Therefore, we recommend to immediately backup all important data and replace the disk.

c, If the ouput report contains a message Aboted by host it means that the user, under which the test was carried out has logged off. As you can see on the next image, the test was not successful until the 5th time. We recommend to notify the user, that his disk is going to be tested, and he should not turn off the PC, or log out.

d, Request of ongoing status didn't show the running test - in some cases, it might occur that after requesting ongoing status of the disk, it states that there are no running tests. In this case, we recommend to wait the 6 hours since beginning of the test and just view the report after the test is completed, as it already contains information about course of the test.


