Scheduling of tasks
Scheduler - this part of the application C-MonitorConsole serves to creation, browsing and modification of lists of tasks, which should be launched by the application C-Monitor. The section Scheduler is opened automatically after the application C-MonitorConsole is launched. It is also possible to enter Scheduler through tray menu of the C-Monitor icon, as displayed on the following image.
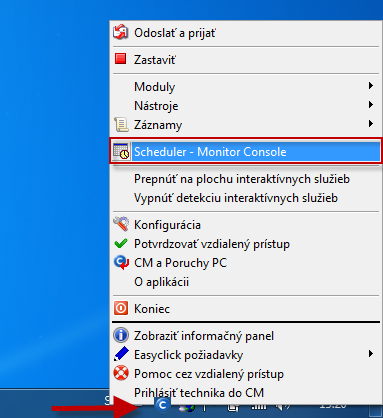
There are two ways to add new tasks for Scheduler
1. Add a task by using the wizard - for adding the most commonly used task a wizard has been created, in which you make necessary settings and just add the task easily
2. Add a task without the wizard - for your personal use, anything can be launched
Schedules may be also edited from CM Portal, for more information go to Scheduled tasks (Schedules).
Add a task by using the wizard
Addition of a scheduled task by using the wizard in Scheduler - Monitor Console is displayed on the following image.
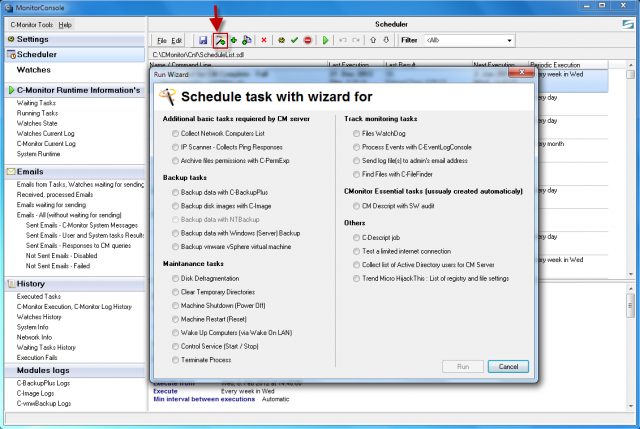
1. After opening Scheduler - Monitor Console, the current list of C-Monitor task will be loaded. In case it doesn't exist, you'll automatically view a dialog to select the wizard for adding tasks.
2. If the dialog for selection of the wizard is not yet displayed, it has to be launched through the option "Add Task With Wizard" from the menu "Edit" of toolbar or from the context menu, as displayed on the image above.
3. Then you have to select wizard for the required type of task, and press the button "Run".
4. When the wizard is displayed, all required fields must be filled in, by pressing the button "Next" go through all of the dialog's forms, and finally close the wizard by pressing "Finish".
5. Then the new task, or more tasks, are added, and are shown in the list of tasks.
6. When all required tasks are added, you have to check their validity by launching the individual tasks by the command "Run Selected Tasks" from the menu "File" of toolbar, or from the context menu.
7. Then the list of file has to be saved by the option "Save" from the menu "File", or from the toolbar. C-Monitor will register a change in the file with tasks, and loads it automatically.
Add a task without the wizard
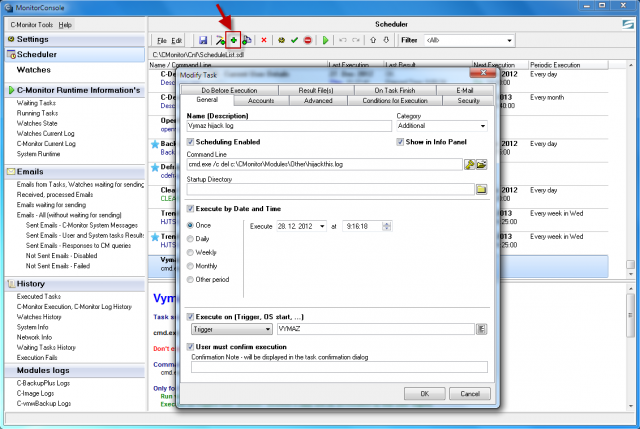
In case you need to set regular launching of certain programs or commands, do so by adding a periodic task without using the wizard, as displayed on the following image. Description of the individual windows is given in the text below.
Tab On Task Finish
Warning: Every task created without the wizard for adding tasks has to be signed for security reasons.
Signing of executable files
This button serves to verification, whether the executable file is given in the Command Line signed = marked as reliable, or not. C-Monitor only launches signed tasks - i.e. a user with admin authorizations has marked the selected tasks as safe via Scheduler. Verification characteristics of executable files are located in the subdirectory "Cnf", in the file „Signatures.bin“. They're bound to license, which is bound to program and mechanical equipment of the computer, so the file is not transportable between computers. In case that the executable file is changed, either deliberately - update, or with bad intention or unintentionally - unwanted rewrite, virus... , C-Monitor won't launch the task, it will generate a record about it and send an informative email to Customer Monitor. Executable files saved by C-Monitor, based on an email request (utilities update, direct save of a file) are signed automatically, as their reliability is guaranteed by the sender, and email with requests is multistage encrypted.
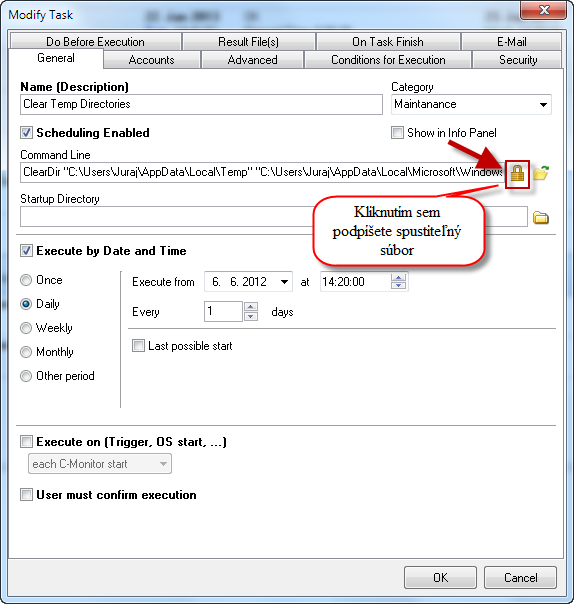
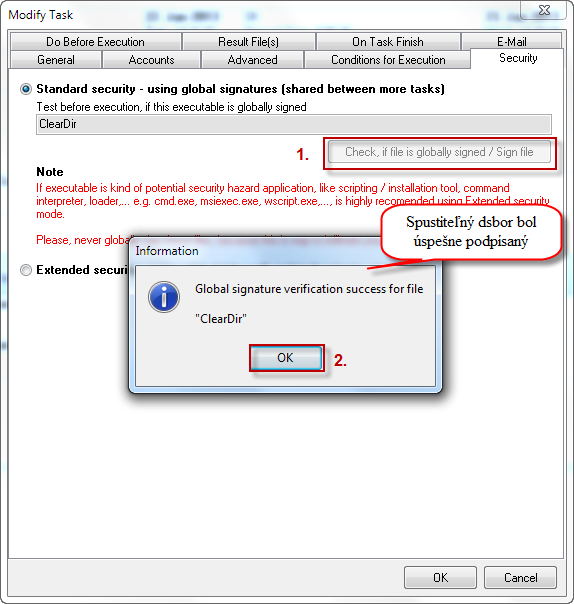
To confirm whether a file is signed, it is absolutely necessary, that C-Monitor is running. The verification process is namely that after pressing the button, Scheduler connects with the running C-Monitor, submits the request to verify the content of command line, and displays the corresponding message according to C-Monitor's response.
Description of the most important parts, which have to be set in the individual tabs is given and described in the text below.
Tab General
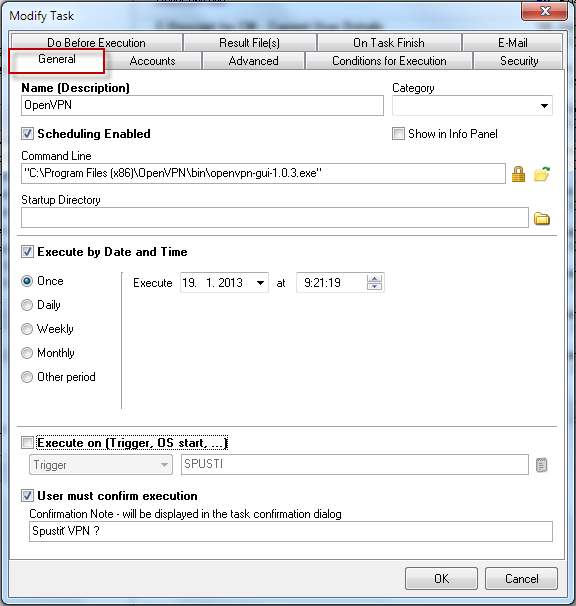
Name (Description) defines name of the executed task. This name will be used in the list of tasks in the application's window, in confirmation dialogs and in C-Monitor logos.
Category - choose an appropriate category for the task
Scheduling Enabled the task can be executed only if this option is ticked
Show in Info Panel when this option is ticked, the task will be displayed in the Information panel.
User must confirm execution if this option is ticked, a simple dialog will show everytime the task should be launched, where the user must confirm that the task will be executed, or optionally postpone the confirmation (execution).
Command Line the command that should be executed
Startup Directory the directory "from which the command line will be executed", it's a closer specification of the current application's directory.
Execute by Date and Time here you can adjust the time interval of the execution
Execute on Trigger, OS started, each C-Monitor start defines whether the task should be executed when a Trigger event occurs, at each start of C-Monitor, or at start of the operating system. Trigger is an event generated for instance at the end of another task, or based on a request delivered to C-Monitor by a control email. This launching principle is equivalent to launching based on date and time. Therefore, a task is either executed based on the current date and time, ot because of a Trigger event. If the application should be launched by a Trigger, this option has to be ticked and you must write the name of the trigger. A Trigger's name is any sequence of letters and numbers, which is not even case sensitive. Closer description of Triggers can be found in the section Synchronization of task execution.
Tab Accounts
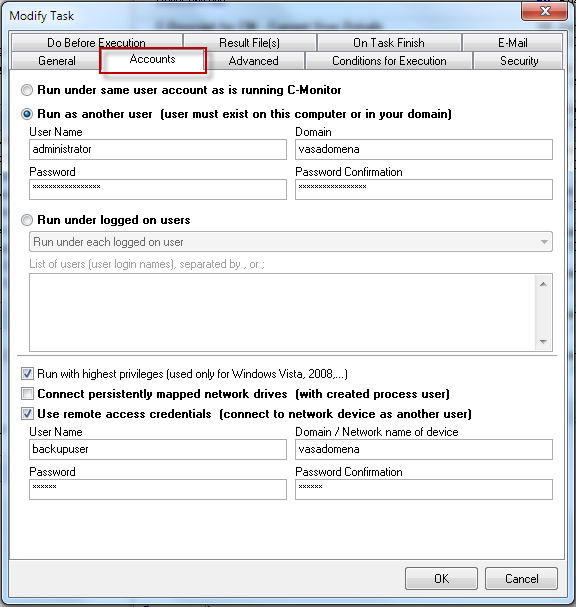
Run under same user account as is running C-Monitor standard option - the task will run under the same user, under whom C-Monitor was launched
Run as another user In operating systems Windows 2000 and newer, C-Monitor allows task execution under another user, e.g. the domain admin etc. If the task should be executed under other user than C-Monitor is running, you must select this option and fill the user's login data
User Name
login name of the user, under whom the task should be executed
Domain
domain of the user, under whom the task should be executed. If it's a local user, you may leave this parameter blank.
Password, Password Confirmation
user's login password, entered twice (to eliminate typing errors, it's standard to type invisible text twice)
Run under logged on users if C-Monitor runs in the service mode, it doesn't show the user interface directly, but uses auxiliary processes that are launched automatically after every user login. Besides mediating the user interface to a user, these processes can also execute tasks under this user (on the basis of communication with the main C-Monitor process). If this option is ticked, C-Monitor will launch this task "in context of each user, to whom the C-Monitor icon is displayed", and who's username meets certain conditions. The task is not executed at each user login, but only when it should be executed - C-Monitor registers which tasks have been executed, in who's context. Username conditions - choose one option from the drop-down list:
Run under each logged on user
Run only under users listed below - in the textfield "List of users (user login names) separated by , or ; "
Run under each user, except users listed below - in the textfield "List of users (user login names) separated by , or ; "
This also applies for a single user.
Connect persistently mapped network drives (with created process user) if this option is ticked, C-Monitor will connect network drives, which should be automatically connected after login, before launching the task (they're persistently mapped). Each user can have network drives connected - created mappings of network paths into logical drives letters, e.g. logical drive unit "Z:" may represent the network path "\\server\documents". After this connection is created, there's an option to determine whether this connection should be established again after login, or not. If the network drives couldn't be connected automatically at login for any reason (e.g. the network path was unavailable), or they've been disconnected (also due to unavailability of the network path), tasks executed by C-Monitor, which assume / expect connection of the network drives (e.g. backup), may not work properly. Therefore it is recommended to select this option for these tasks - C-Monitor will try to establish the connection just before launching them.
Use remote access credentials (connect to network device as another user) this option is most commonly used for backup tasks. By selecting this option, you choose a user under which you login to a network storage, e.g. QNAP, to which backups are saved. Example: A backup task is executed under a local account, which, however, doesn't have access to the backup device. Therefore, you select the option Use remote access credentials and here you'll enter the user, under which will the task access the network storage, with his access password, for example Backup user. The backup will then run properly, with no need to add any further permissions to access the network storage.
Tab Advanced
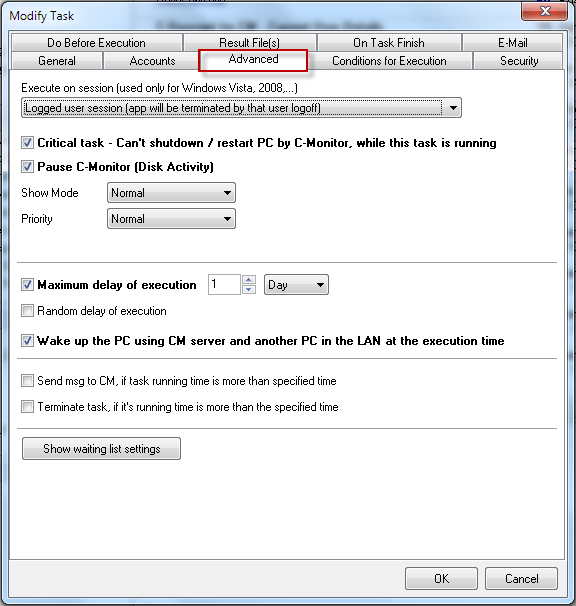
Image: Záložka Advanced
Execute on session (used only for Windows Vista, 2008,..) - you may choose in which session will the task run. In Windows servers and Vista and higher, display of applications is divided to Session 0 and User session, so it's necessary to choose where the application will show. If you execute a task on Session 0 and someone is logged in, he'll receive a notification that Interactive services require user intervention (these messages may be disabled by C-Monitor - through Tray menu). That's why you need to have this item set up properly, so the user only sees what he ought to. We must point out, that the option to choose session is different than "Run as". Session defines where the application will be executed & displayed and Run as defines what authorization will the application have.
You may choose from these options :
Always session 0 - the advantage is that the application won't be interrupted if anyone logs out
Logged user session - launch on a logged user's session, if he logs out, the application will be also terminated
Logged user session / session 0 - session 0 will be used only if no one is logged in
Some of specified logged user session - new option since C-Monitor 2.6.628.0, to specifically define at which user should the application be executed
Critical task - can't shutdown / restart PC by C-Monitor, while this task is runnig - if this option is ticked, C-Monitor won't execute any other task, which would require PC restart
Pause C-Monitor (Disk Activity) - If this option is ticked, C-Monitor won't write and won't read anything from the disk while the task is running. This option was included to support execution of applications such as disk defragmentation etc, during which it's required that nothing is written on the disk.
Show mode - Defines in which mode should the application, specified by command line, be executed
Hidden the application's window will be (should be) invisible after launch
Normal the window will have its usual size and location
Minimized the application's window will be (should be) minimized after launch
Maximized the application's window will be (should be) maximized after launch
Priority - Defines what priority will the application, specified by command line, have.
Low the application will have low priority
Normal the application will have normal (usual) priority
Min interval between executions - here you'll enter the minimal interval for the next launch of the scheduled task
Wake up the PC using CM server and another PC in the LAN at the execution time - By selecting this option, the PC will be automatically woken up before the task is launched on CM's instruction by Wake on LAN. Packet for waking up is delivered through a turned on computer with C-Monitor in LAN. For PC setup for Wake on LAN, read the section PC Maintenance.
Tab Conditions for Execution
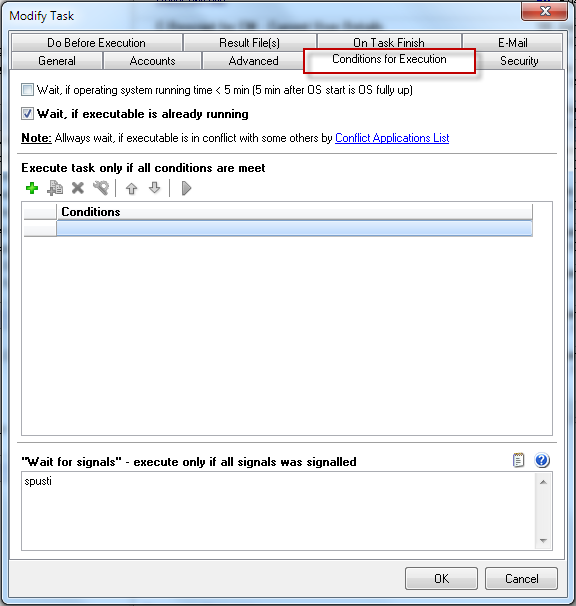
Image: Záložka Conditions for Execution
Here you can define a list of conditions, which must all be met, for the task included in the list of tasks waiting for execution to be executed. A condition may result certain actions to be performed (e.g. termination of a process), therefore you must consider the sequence of the conditions. Condition no. 1 is tested first, if it's met then condition no. 2 and so on. However, if a condition is not fulfilled, the task won't be launched and at the next selection of tasks for execution, the testing will start again by condition no. 1.
Wait, if operating system running time <5 min - means that the task won't be executed in the first 5 minutes after start of the operating system
Wait for signals - execute only if all signals was signalled - the task will be executed only after the given signal is received, which signalizes execution of the task, read more in the section Synchronization of task execution
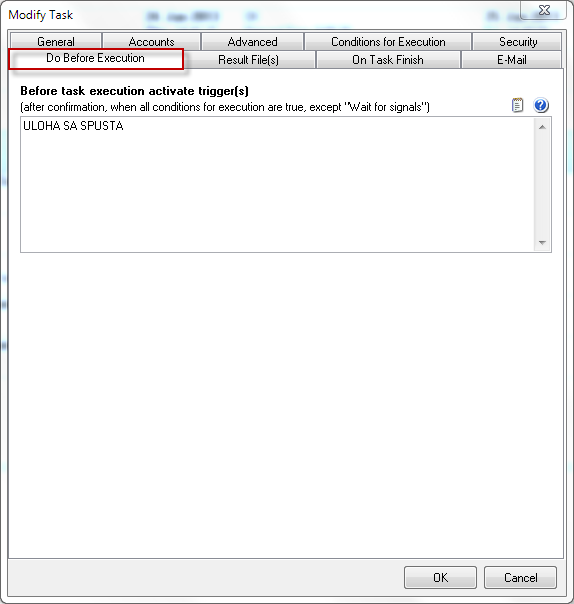
Tab Do Before Execution
In this tab you have an option to activate a Trigger before launching this scheduled task, this might be useful if it's necessary that tasks are executed concurrently. Click on the blue question mark to view the hint.
Tab On Task Finish
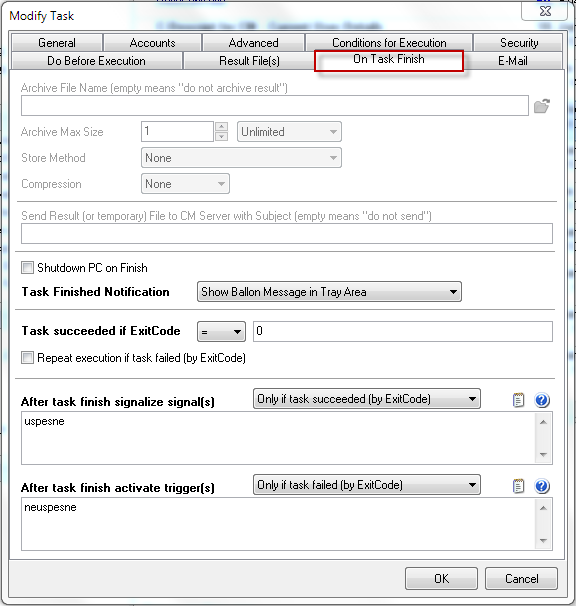
Image: Záložka On Task Finish
Shutdown PC on Finish - PC will automatically turn off when the task is completed
Task Finished Notification - options of notification about the finished task
Task succeeded if ExitCode - here you'll enter the exit code for a successfully executed task, standard exit code of successful task is 0
Repeat execution if task failed (by ExitCode) - if you select this option, then in case the task is not completed successfully based on your given exit code, it's going to be re-executed until it's not finished successfully.
After task finish signalize signal(s) - a signal will be signalized after the task is finished , you may choose to signalize after successful or failed completion of the task, according to the exit code. Read more at Synchronization of task execution.
After task finish activate trigger(s) - a trigger will be activated after the task is finished, you may choose the trigger to be activated after successful or failed completion of the task, according to the exit code. Read more at Synchronization of task execution.


