Synchronization of task execution
Synchronization of task execution provides that scheduled tasks are executed in a required order, and that every task is launched only when the previous one is finished.
There are two ways to perform setup of this type of scheduled tasks execution - via Signals and Triggers. Signals and Triggers are practically just strings of letters (word) of your personal choice. The same strings are entered in inicialization (sending) and also where they should be used.
The difference between a Signal and a Trigger is how will the scheduled task be executed.
Signal has the meaning of a traffic light - when a car gets to the light (the task's repetition interval is reached), it waits for the green light before it can pass (the scheduled task is launched).
Trigger has the meaning of a gun trigger. Ammunition is ready in the magazine (a task, which doesn't need to have any repetition interval, is set up in the Scheduler) and when you press the trigger, it shoots (the task is launched immediately)
Sending of a Signal and Trigger from a scheduled task may be limited based on a successful completion of the task, which sends the Signal or Trigger.
Setup of sending Signals and Triggers is done in the scheduled task's settings - right-click the task and select Task Properties.
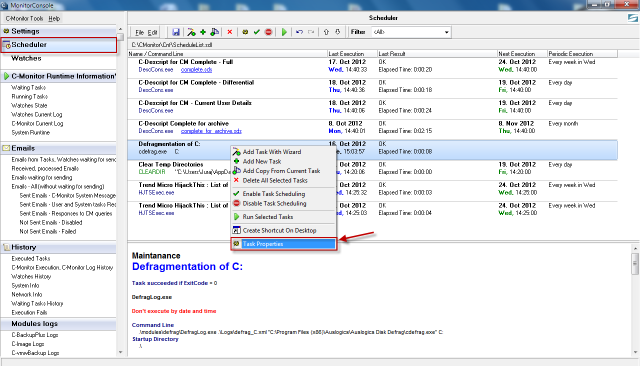
Typical scenarios of using Signals and Triggers :
A. Blocking of a periodically scheduled task's execution until the previous one is finished, according to reception of a signal about successful completion of the previous task
Typical use is at management of backups from one medium to another as quickly as possible after the backup to the first medium is finished. Each task must have its own backup period, so it would be properly notified in case it fails (CM server makes a check, that it always expects successful course of the backup, up to certain number of backup intervals).
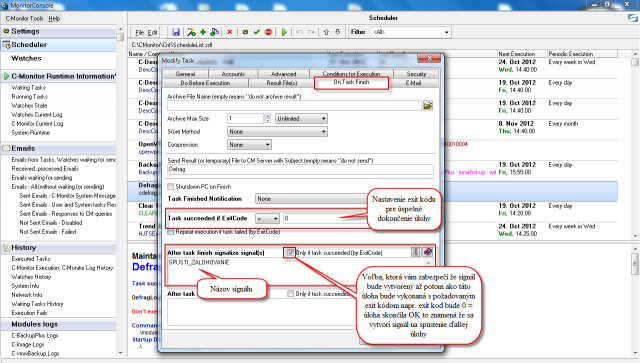
In the tab On Task Finish enter your name of the Signal into the field After task finish signalize signal(s). As we only want the next task to be executed when the previous one is finished, select the option Only if task succeeded by ExitCode - signal is created after successful completion of the scheduled task according to exit code, as is displayed on the following image. How to choose the ExitCode is described at the end of the article.
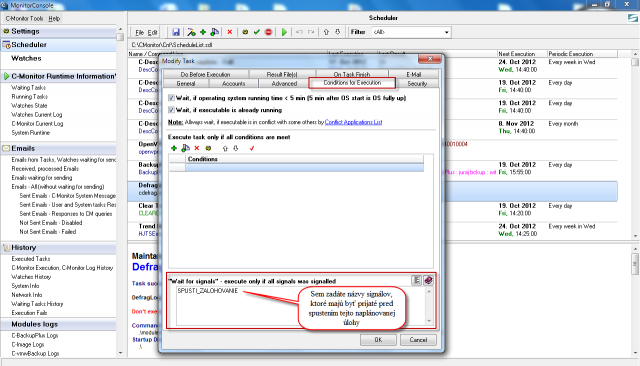
Subsequently, you open settings of the task that should proceed, and in the tab Conditions for Execution, you may enter name of the signal into the field Wait for signals at the bottom. Unless this signal is received, the task will not be executed.
B. Execution of scheduled task anytime after the previous one is finished, after reception of a Trigger
Use of Trigger is typical for execution of a task, which should be launched immediately after reception of the trigger, e.g. deletion of an older backup after a new one is created etc.
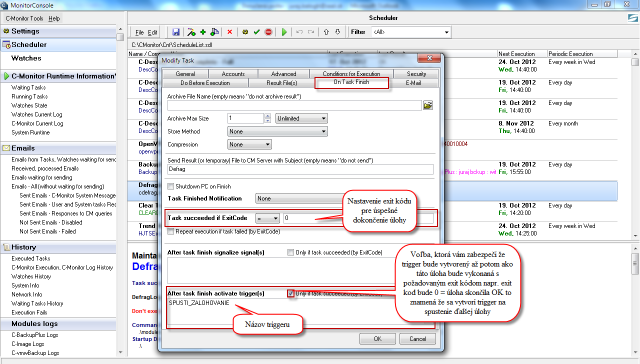
In the tab On Task Finish enter your name of the Trigger into the field After task finish activate trigger(s). As we only want the next task to be executed when this one is finished successfully, select the option Only if task succeeded by ExitCode - trigger is created after successful completion of the scheduled task according to exit code, as is displayed on the following image. How to choose the ExitCode is described at the end of the article.
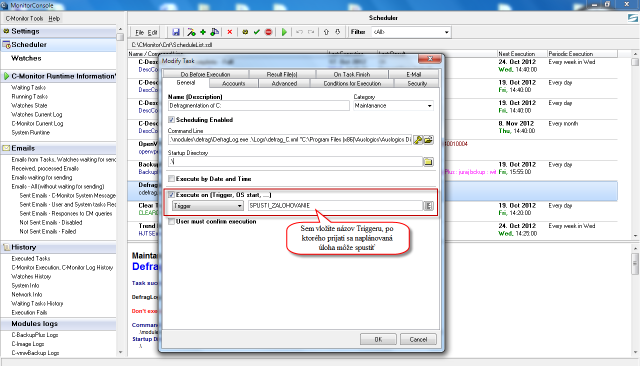
Subsequently, you open settings of the task that should proceed, and in the tab General, you may select Execute on Trigger at the bottom, where you'll enter the name of the trigger, which unless is received, the task won't be executed.
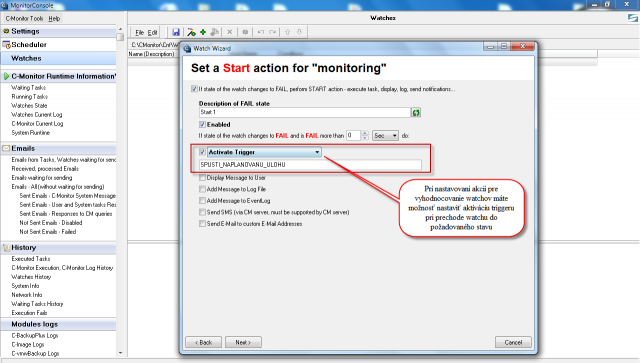
You may also choose to create a trigger at setup of actions, which are carried out when a watch is switched to another state. In the section Set a Start action, select the option Activate trigger, and enter its name, as displayed on the next image.
Note how to define Exit code to determine a successful task completion : A properly written program has Exit code = 0 after a successful process and if an error occurred, Exit code should vary from zero. Developers of the given program should assign some Exit code to particular errors (a number). You might want certain errors to be ignored and the process to still be successful, so that the next task can be executed. That's why there's the option in scheduled task settings "Task succeeded if ExitCode =".


